Labelling in the GUI#
Creating labels#
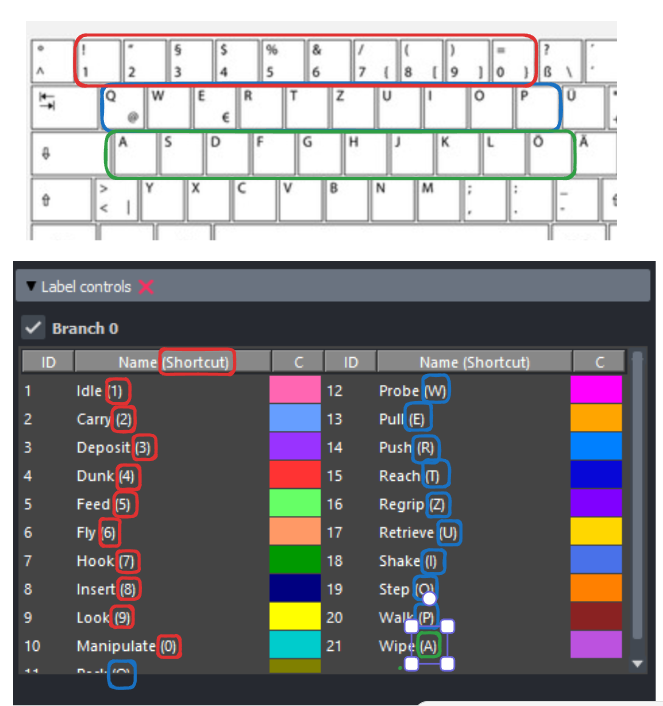
The Labelling dropdown at the top of the Labels tab chooses where a new label’s boundaries come from. Both modes use the same label keys (see image below), and everything after the time is read — undo, overlap resolution, the label table, the grids, export — is identical.
On the time series (click the plots)#
Press one of the number/letter keys to activate a behavioural label.
Click twice on a plot to define the start and end boundaries of the label. For point events, click only once.
The label is created and displayed with a colour-coded overlay.
At the current frame (the label key places it)#
The classic ethogram-software workflow, for labelling from the video alone:
Navigate to the frame — play with
Space, scrub the timeline, or step withLeft/Right.Press the label’s key. A point event is placed on that frame and you are done.
For a state event the first press marks the start (a dashed anchor appears on the plots). Navigate to the end frame and press the same key again to close it. The playhead stays where you are, ready for the next label. Pressing a different label’s key abandons the half-placed one and starts that class instead.
To move an existing label in this mode, select it, press Ctrl+E, then press its key at the new start and again at the new end (a point event takes one press).
With a video the boundary is the frame on screen, exactly as frame-by-frame curation commits it; without one it is the red time marker.
A panel to see the labels on#
Labels are drawn on the plot panels, so a session with only a video would have nowhere to show them. The Label timeline — an empty time axis carrying only the label overlay — fills that gap: it is the first entry in the ➕ Add panel popup, and with Open a label timeline when no panel is shown ticked (Labels tab, on by default) it opens by itself when a dataset loads with no other panel.
Who the labels are about#
The Individual section at the top of the right sidebar is shown for every panel except the video, whatever backend the data came from. It holds two dropdowns:
Individual — the animal performing the behaviour. Switching it switches the labels you see and create.
Receiver — for dyadic interactions (one bird mounting another, one animal grooming another). It is
Noneby default, meaning a solo behaviour.
Note
A new label is placed for the individual of the panel you last clicked —
whether that panel follows the sidebar combo or is pinned to another animal
(📌). The bottom bar shows labelling: <individual> so you always know whom
the next label belongs to.
The pair is stored per label in the TSV’s individual and individual_rec
columns — see the column reference.
Playing back labels#
Once you’ve created a label, click on it and press v to play the segment.
You can also use Left / Right to navigate individual frames, or right-click
to jump to specific timepoints. Over time you may find this faster than
playing the video.
Editing and deleting labels#
Use the labels widget interface:
Edit: Select a label (Left-click) and press
Ctrl + E. Then click twice to set the new start and end, or once to move a point event. In the at the current frame mode, press the label’s key at the new start and again at the new end instead (once for a point event).Delete: Select a label (Left-click), press
Ctrl + Dto delete.
Changepoint correction#
See Changepoint correction for how label boundaries are snapped to detected changepoints.
Importing / exporting labels#
Labels are imported and exported from the top-bar File menu: Import labels…, Import predictions…, and Export labels… each open their own panel. See Importing labels and Exporting labels for details.